
Staticbot for chat and coding agents
Deploy repositories, migrate AI-built apps, manage DNS, and run Continuous Sync from the AI tool where you already work. Connect the hosted MCP server to Lovable or ChatGPT, use Codex Desktop with browser control to guide the setup, or use focused skills with an API key in Codex CLI, Claude Code, and other coding agents.
Hosted chat uses OAuth. Coding agents use focused skills with an organization-scoped API key; MCP is optional for CLI workflows.
Choose how you work
Inside the builder
Lovable
Optional. Add Staticbot in Lovable's Connectors screen to migrate or deploy from the same chat you build in. Everything also works in the Staticbot app.
Hosted chat
ChatGPT
Add a ChatGPT personal plugin and work entirely from chat. Codex Desktop can guide the setup through browser control. No Node.js, API key, or local process.
Coding agents
Codex CLI, Claude Code, and more
Install the focused deployment, migration, and sync skills, then provide an API key through the agent's environment. MCP is optional.
Hosted
Streamable HTTP MCP
OAuth + PKCE
Account authorization
59 tools
Typed and discoverable
Read + write
Explicit delegated scopes
Lovable
This is optional. Every migration and deployment works in the Staticbot app without it. Connect it only if you would rather stay in Lovable.
Lovable connects to Staticbot, not the other way round: you add Staticbot as an MCP server in Lovable's Connectors screen, and Lovable's assistant calls it as you. That lets the builder you already work in migrate the app's backend onto Supabase you own and deploy the frontend to your own hosting — without switching tools mid-task.
Custom MCP servers work on every Lovable plan. On Business and Enterprise workspaces an admin can turn connectors off for everyone, which is the first thing to check if the Connectors screen is missing.
- 1
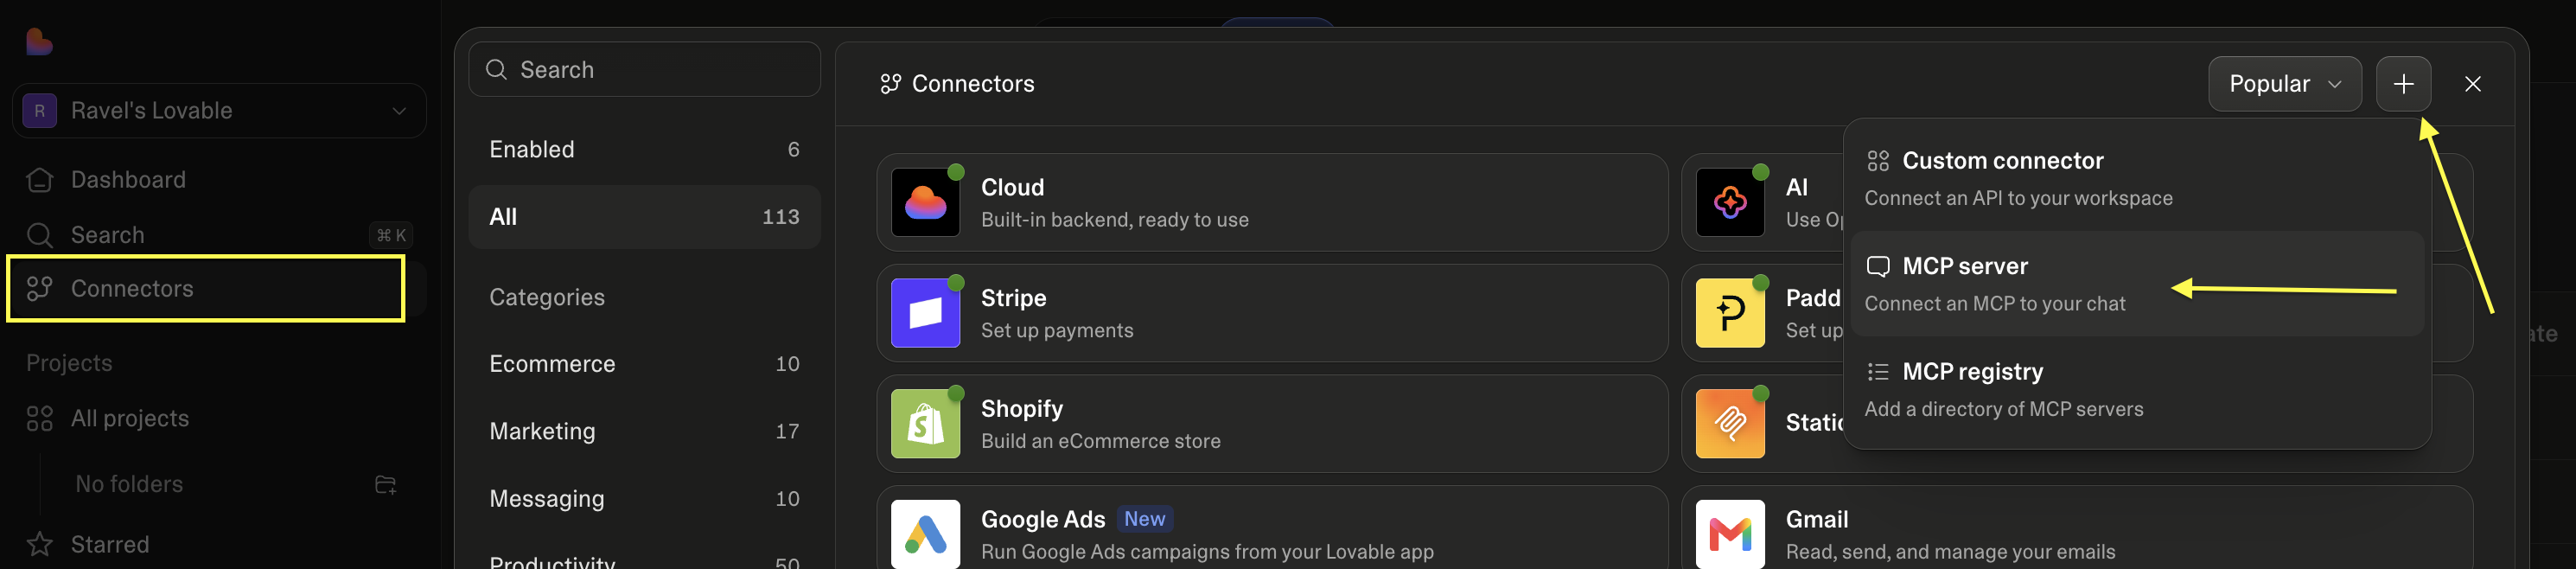
Open Connectors → + → MCP server
Connectors is in Lovable's left sidebar; the plus button is at the top right of the panel.
- 2
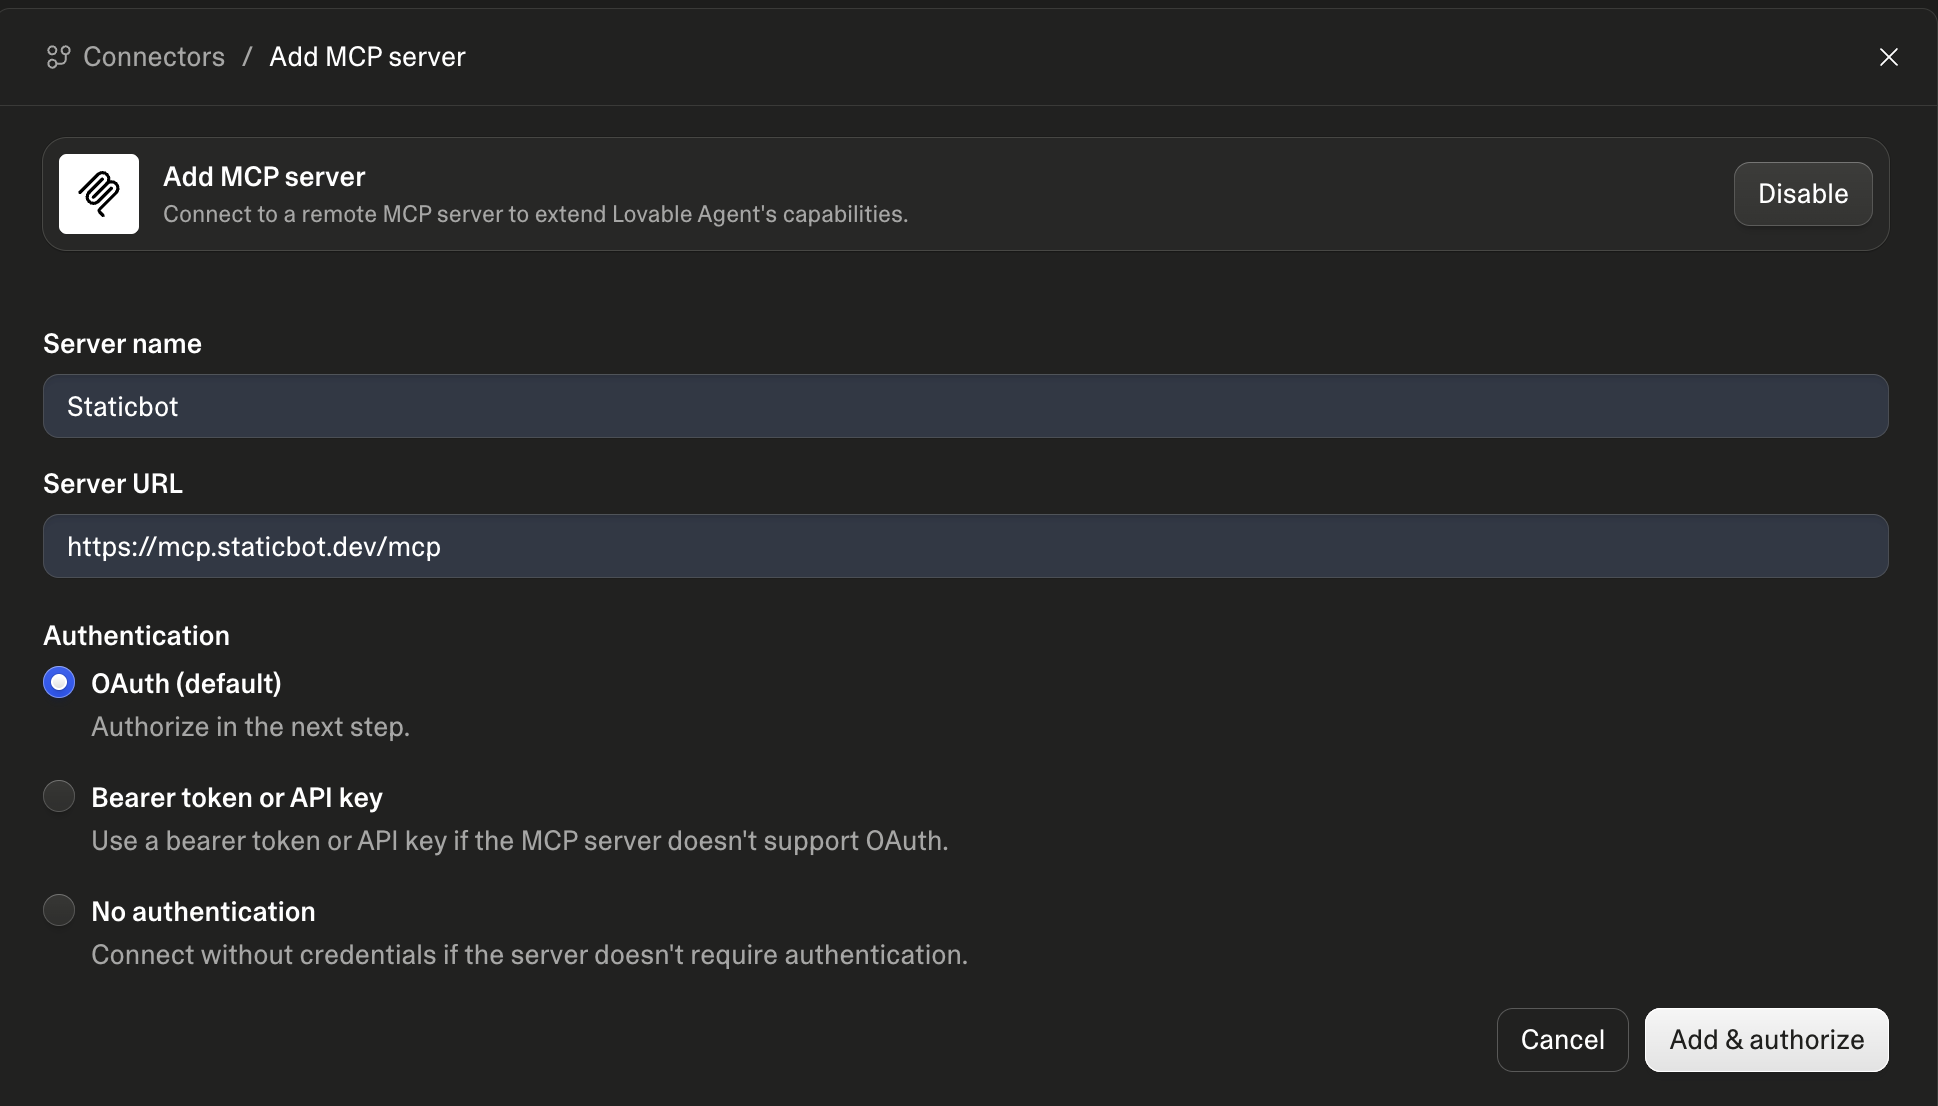
Name it Staticbot and paste the server URL
Leave authentication on OAuth — the default.
- 3
Add & authorize
Sign in with the Staticbot account whose integrations you want Lovable to use.
- 4
Ask it something read-only first
"What's connected in my Staticbot account?" proves the whole path before you change anything.
Hosted MCP for ChatGPT
ChatGPT connects to your Staticbot account over the production MCP endpoint. Codex Desktop can use browser control to configure the personal plugin in your signed-in ChatGPT account. Sign in and approve delegated access when prompted—there is no API key to paste into a conversation and no local server to maintain.
The public ChatGPT Plugins Directory listing is pending review.
You do not need to wait: enable Developer mode and add the production MCP URL manually using the steps below. The button opens plugin settings; Staticbot will not appear in Public search yet.
ChatGPT
- 1
Enable Developer mode
In ChatGPT, open Settings → Security and login, then turn on Developer mode. Availability depends on your plan and, on Team or Enterprise, your workspace policy.
- 2
Create the connection
Open ChatGPT Plugins, select the plus button, name it Staticbot, and enter the production MCP URL below.
- 3
Configure the OAuth client
Choose User-Defined OAuth Client. Set the Client ID to staticbot-openai, set token endpoint authentication to none, and leave PKCE enabled. This step is required — Staticbot does not support dynamic client registration, so a connection created without this client ID will fail to authorize.
- 4
Sign in and choose scopes
Sign in to Staticbot and approve the scopes shown. For a read-only connection select staticbot:read only; add staticbot:write only when you intend to let ChatGPT make changes.
- 5
Use it
Start a new chat and select Staticbot from the tools menu.
Claude
Claude Code connects today using the API-key setup below — the same one Codex CLI uses. It runs the Staticbot MCP server locally, so it needs Node.js and a Staticbot API key rather than a browser sign-in.
A hosted connector for Claude apps that cannot run a local server is not available yet. We would rather say that plainly than have you paste a URL that fails to authorize.
Set up Claude CodePrompt for Codex Desktop with browser control
Use browser control to set up Staticbot in my signed-in ChatGPT account.

1. Open ChatGPT Settings → Security and login and enable Developer mode.
2. Open Plugins and add a personal plugin named Staticbot using https://mcp.staticbot.dev/mcp.
3. Choose User-Defined OAuth Client. Set client_id to staticbot-openai, token endpoint authentication to none, and use PKCE.
4. For a read-only connection, select staticbot:read only. Select staticbot:write during setup only if I explicitly ask for write access.
5. Let me take over only when I need to sign in to Staticbot or approve OAuth.
The agent can navigate the setup UI, but ChatGPT account/workspace policy still controls Developer mode availability. You complete the Staticbot sign-in and OAuth approval when prompted.
Production MCP URL
https://mcp.staticbot.dev/mcpWhat Staticbot can do from chat
The live server is authoritative for current tool names, schemas, and action guidance. Its tools cover the complete workflow, not just a deployment trigger.
Analyze and deploy repositories
Detect the workload, choose the supported AWS or Cloudflare target, create the stack, deploy it, and monitor progress.
Migrate AI-built applications
Move Lovable, Bolt, Base44, and Firebase projects to customer-owned Supabase with discovery, migration-strategy, and switchover approvals.
Manage domains and DNS
Inspect required records, push deployment-owned records to a connected Cloudflare zone, and recheck verification.
Operate Continuous Sync
Inspect change sets, trigger sync, and review, retry, skip, or approve paused work.
Build previews and packages
Generate migration previews and retrieve portable migration packages for self-managed targets.
Roll back safely
List valid pinned versions and roll back or redeploy only after the exact target is confirmed.
OAuth permissions are explicit
Hosted clients can request two delegated scopes: staticbot:read for inspecting your account and staticbot:write for actions such as deployments, migrations, DNS updates, sync operations, and rollbacks. For a read-only connection, select only staticbot:read. Select staticbot:write during setup only when you want write operations.
Authorization does not remove workflow safeguards. Staticbot still surfaces migration discovery, destructive database changes, failure decisions, and exact rollback targets before consequential actions continue.
There are two decisions to understand before starting a migration. When Staticbot finds an official Lovable Cloud Data export in your source project, it asks you to choose a migration method: restore the snapshot or replay your SQL migration files. The agent explains both options and uses the one you choose. And when the target Supabase project already contains objects, a target-conflict report lists exactly what is there and what each cleanup scope would remove. Cleaning a target is irreversible and needs you to confirm both the scope and the project reference.
Codex CLI, Claude Code, and coding agents
For terminal coding agents, the recommended setup is the focused Staticbot skills plus an organization-scoped API key. Hosted OAuth setup and MCP are not required; add the local package only when you specifically want typed MCP tool discovery.
Recommended: focused skills + API key
Install the deployment, migration, Continuous Sync, and direct-API fallback skills from the public repository. Create an API key in Staticbot and expose it to the coding-agent process as STATICBOT_API_KEY.
- Create an organization-scoped key at app.staticbot.dev/developer.
- Load it into the current terminal session with the command below. Input is hidden and the raw key is not written into shell history.
- Paste the matching installation prompt into Codex CLI or Claude Code.
Load the API key for this terminal session
printf 'Staticbot API key: '
IFS= read -rs STATICBOT_API_KEY
printf '\n'
export STATICBOT_API_KEY
Prompt for Codex CLI
Use $skill-installer to install these seven Staticbot skills as personal skills from https://github.com/bitfiction/staticbot-mcp/tree/main/skills:

- deploy-web-app-with-staticbot
- migrate-vibe-coded-app
- sync-vibe-coded-app
- live-migrate-ai-built-app
- live-migrate-lovable-app
- live-migrate-base44-app
- staticbot

Do not install or configure the Staticbot MCP server. Confirm the installed paths and list all seven installed skills.
Prompt for Claude Code
Install these seven directories from https://github.com/bitfiction/staticbot-mcp/tree/main/skills as personal Claude Code skills under ~/.claude/skills:

- deploy-web-app-with-staticbot
- migrate-vibe-coded-app
- sync-vibe-coded-app
- live-migrate-ai-built-app
- live-migrate-lovable-app
- live-migrate-base44-app
- staticbot

Copy each complete skill directory, including its scripts and references. Do not install the Staticbot plugin or configure MCP. Validate the result with "claude plugin validate ~/.claude/skills" and report the installed paths and validation result.
The skills call Staticbot's REST API through the credential-safe fallback when MCP is unavailable. No MCP connection is required.
Or install the plugin in one step
The repository is also a Codex and Claude Code plugin. Adding the marketplace installs the MCP server and all four skills together, so you skip the per-skill prompts. Staticbot does not need to be in a central registry for this — the marketplace is the public GitHub repository itself. Set STATICBOT_API_KEY in the environment that launches the agent, then restart it (or run /reload-plugins) if Staticbot does not appear straight away.
Codex CLI
codex plugin marketplace add bitfiction/staticbot-mcp
codex plugin add staticbot@staticbot
Claude Code
/plugin marketplace add bitfiction/staticbot-mcp
/plugin install staticbot@staticbot
Plugin skills are namespaced: /staticbot:deploy-web-app-with-staticbot, /staticbot:migrate-vibe-coded-app, /staticbot:sync-vibe-coded-app.
Optional: local MCP with the same API key
Use this path only when you specifically want local MCP tool discovery. First run the hidden-input API-key commands above, then run the command for your client. The commands write the expanded key to that client's user-level MCP configuration; never run them in a repository script or paste the key into chat.
Codex CLI
codex mcp add staticbot \
  --env STATICBOT_API_KEY="$STATICBOT_API_KEY" \
  -- npx -y @staticbot/mcp
codex mcp get staticbot
Claude Code
claude mcp add --scope user staticbot \
  -e STATICBOT_API_KEY="$STATICBOT_API_KEY" \
  -- npx -y @staticbot/mcp
claude mcp get staticbot
Requires Node.js 20 or newer. Both command blocks finish by reading the saved staticbot connection back for verification.
What the focused skills add
Skills provide opinionated sequences, approval requirements, recovery guidance, and a direct REST fallback authenticated with STATICBOT_API_KEY. MCP can add typed tool discovery, but the coding-agent workflow does not depend on it.
deploy-web-app-with-staticbotRepository analysis, target selection, deployment, DNS, and rollback.
migrate-vibe-coded-appDiscovery, preview, Supabase migration, and switchover.
sync-vibe-coded-appSync inspection, destructive-change review, retry, and recovery.
live-migrate-ai-built-appLive cutover of a Lovable or Base44 app: test migration, maintenance page, write freeze, final copy, verification, and domain switch.
$skill-installer install the Staticbot skills from https://github.com/bitfiction/staticbot-mcp/tree/main/skills
Try these requests
“Deploy this repository with Staticbot. Explain the detected workload and selected target before starting production.”
“Migrate my Lovable app to a Supabase project I own. Stop after discovery and show me the inventory.”
“Show the DNS records required by my deployment, push the safe records to my connected Cloudflare zone, and recheck verification.”
“Inspect the latest Continuous Sync run. If it contains destructive SQL, explain the changes before I decide.”
“List valid rollback versions for this website. Do not roll back until I confirm the exact commit.”
Your infrastructure, available from chat
Connect the hosted MCP server, authorize your Staticbot account, and start with a real deployment or migration request.