
Migrate from Base44 to Supabase
Base44 → Supabase migrations are free for a limited time
No credit card. No project-size limit. Promotional offer — pricing may change.
Move your Base44 app to a Supabase project you own — without resetting a single user's password.
Base44 is a first-class supported source platform in Staticbot. Both common Base44 architectures are covered: apps using Base44's managed entities and integrations via @base44/sdk (the platform default), and apps that have already been wired to their own Supabase project. Pick the variant that matches your app below and we'll walk you through what moves and how.
Either way you end up with a Supabase project you fully own, your existing users intact (passwords and OAuth identities preserved), and your data, functions, and storage moved over. Point your frontend at your own AWS or Cloudflare (or at Staticbot-managed AWS). Optionally keep building in Base44 afterward — Continuous Sync flows every push to your own production backend.
Pricing: Base44 · Supabase · Staticbot (free for Base44 migrations right now).
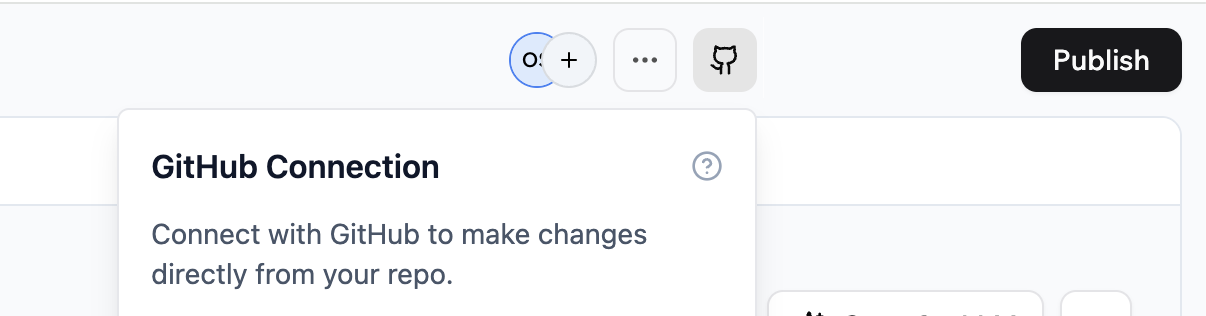
Prerequisite: connect your Base44 project to GitHub
Staticbot reads your project via GitHub, so your Base44 app must be synced to a GitHub repository before you start a migration. Open your project dashboard, click the GitHub icon in the top panel, and follow the prompts to authorize and link a repository.
Want to know what moves and what doesn't before you migrate?
Staticbot runs a compatibility scan over your Base44 app during discovery and shows you a personalised report — every entity, every server function, every SDK call — grouped into three buckets: handled automatically, one-time setup, and needs your attention after migration. The same report ships inside the downloadable migration package as 00_compatibility_review.md, formatted so your AI assistant can take the punchlist and finish it in one prompt.
For a plain-English explanation of where Base44 and Supabase line up (and where they don't), read Base44 vs Supabase: what actually moves when you migrate.
First: which kind of Base44 app do you have?
A. Base44 with managed entities & integrations
Most commonYour app uses @base44/sdk with createClient({ appId, headers }). You define entities visually in Base44, call .entities.X in your code, and rely on Base44's Core.InvokeLLM / Core.UploadFile etc. for AI & file features. You do not own a Supabase project today.
How we handle it: Staticbot translates your Base44 entity schemas into Postgres tables on a fresh Supabase project, imports every row of entity data via Base44's REST API, and rewrites src/api/base44Client to a drop-in shim that maps every Base44 SDK call onto Supabase. Your app keeps calling .entities.X and Core.UploadFile exactly as before — only the backend changes.
Read the compatibility deep-dive to see exactly which Base44 features have a direct Supabase mapping, which need a one-time setting, and which need light wiring after migration.
B. Base44 already wired to your own Supabase
Your code uses @supabase/supabase-js with VITE_SUPABASE_URL set in Base44 platform secrets. Your data already lives in a Supabase project; Base44 is essentially your UI editor.
How we handle it: Staticbot reads your Base44 GitHub repo, auto-detects the source Supabase URL straight from the deployed bundle (no copy-paste from Base44 secrets), then moves your DB, edge functions, storage, vault secrets, cron jobs, and auth users — passwords intact — to a Supabase project you own. The final step is repointing Base44's platform secrets at the new project (we show the values with copy buttons; ~30 seconds).
The manual section further down covers this variant step by step if you prefer to drive it yourself.
Not sure which one applies? Open src/api/ in your repo. If you see base44Client.{js,ts} calling @base44/sdk, you're variant A. If you see supabase from @supabase/supabase-js with a VITE_SUPABASE_URL env, you're variant B. Both work — Staticbot detects which one you have during discovery.
Then: automated or manual?
Manual Migration
Use the Base44 CLI + Supabase CLI to dump, restore, and switch over yourself. Full control, no third-party tools touching your data. For variant B (already on your own Supabase). Variant A's entity translation + shim swap is too much to drive by hand — go automated for that.
Automated with Staticbot
RecommendedStaticbot detects your source Supabase from the deployed app and handles schema, data, edge functions, storage, and auth in a guided dashboard.
Automate the hard parts of your Base44 migration
Whether your app uses Base44's managed entities & SDK (variant A) or already has its own Supabase wired up (variant B), Staticbot inventories what needs to move, runs a compatibility scan, and executes each phase automatically — with full visibility into every step. For variant A we synthesise tables from your Base44 entity schemas, import every row via Base44's REST API, and swap src/api/base44Client for a drop-in shim so your code keeps working unchanged.
Personalised punchlist of what auto-translates, what needs one-time setup, what needs your attention — shown before you confirm
Variant A: translates your Base44 entity schemas into Postgres CREATE TABLE DDL on a fresh Supabase project
Variant B: reads VITE_SUPABASE_URL straight from your deployed *.base44.app bundle — no copy-paste from Base44 secrets
Applies schema (synthesised for A; from supabase/migrations/ for B) to your new target
Variant A: row-by-row via Base44 REST API. Variant B: full export via temporary edge function with FK-aware ordering
Variant A: ports Base44 backend functions onto Supabase Edge Functions with shim wiring. Variant B: deploys existing edge functions
Variant A: copies Base44 assets into a Supabase Storage bucket. Variant B: recreates buckets and copies files
Migrates auth users with bcrypt hashes (variant B) or sets up Supabase Auth from your Base44 auth config (variant A) — no password resets either way
Pushes a branch swapping @base44/sdk for the shim — your .entities.X / Core.UploadFile calls stay unchanged
AI diagnoses failed jobs and suggests fixes you apply in one click
Real-time status for every step of the migration
Variant A
Connecting an SDK-native Base44 app
Pick the Base44 integration on the migration form. You'll paste your Base44 appId and api_key from your app's Settings → API screen — Staticbot uses them to read your entity schemas and data through Base44's REST API. No source Supabase needed; Staticbot creates a fresh one as the target.
Phase 1 also runs a compatibility scan over your entities, server functions, and frontend SDK calls. You see exactly what's auto-handled, what needs a one-time setting, and what needs light wiring after migration — before you confirm.
Variant B
Connecting a Base44 app already on Supabase
Base44 stores VITE_SUPABASE_URL and VITE_SUPABASE_ANON_KEY as platform secrets — they're not in your GitHub .env. The migration form's "Detect from deployed URL" button fetches your deployed *.base44.app bundle and reads the Supabase URL + anon key Vite inlined at build time. No copy-paste from Base44 secrets UI required.
From there it's a standard Supabase-to-Supabase migration: schema, data (with bcrypt password hashes intact), edge functions, storage, vault secrets, cron jobs, OAuth identities — all moved to a Supabase project you own.
The switchover — how your live app starts using the new backend
Variant A (SDK-native): Staticbot pushes a branch to your GitHub repo that swaps @base44/sdk for the @bitfiction/base44-supabase-shim, rewrites src/api/base44Client to point at your new Supabase, and patches package.json + .env.production. Your code's .entities.X / auth.me() / Core.UploadFile calls stay byte-identical — the shim translates them onto Supabase at runtime. Review the PR, merge, deploy.
Variant B (BYO-Supabase): Base44 reads VITE_* from its platform secrets store, not the repo. Staticbot shows the new target URL + anon key with copy buttons — paste them into Base44's secrets UI (or ask Base44's AI to "update secrets to these values"), then redeploy. ~30 seconds.
How discovery + data export work
Variant A (SDK-native): discovery hits Base44's REST API directly using your appId + api_key to fetch entity schemas, then translates them to Postgres CREATE TABLE DDL. Data import calls Base44's REST API page-by-page and writes rows into your new Supabase. No chat prompts, no waiting on platform deploys.
Variant B (BYO-Supabase): Staticbot commits a temporary staticbot-export-<id> edge function to your repo so it can read directly from your source Supabase. Base44 needs to deploy it before the export can run — the migration pauses and shows the exact chat prompt to paste into Base44 (e.g. deploy edge function staticbot-export-abc12345). Once Base44 confirms, click Validate → Done — Synced and the export resumes. The function is removed by a cleanup job at the end.
AI Troubleshooting
When a migration job fails, click the AI button to get an instant diagnosis. The AI reads the error, your migration files, and your repo context, and suggests a concrete fix — often a corrected SQL statement you apply with one click.
- Analyzes error context and migration files
- Suggests corrected SQL you can review
- One-click apply and automatic retry
Automated Data Migration
No CSV exports. No manual table ordering. Staticbot exports data from your source Supabase via the temporary edge function and imports into the target, handling foreign-key dependencies for you.
- Automatic export from source project
- Dependency-aware import ordering
- Storage buckets + files copied too
The pipeline, end to end
Phase numbers and stage names match what you see in the Staticbot dashboard. Variant A and variant B share the discovery + compatibility scan up front, then diverge through phases 2–7 because the source-of-truth is different — Base44's REST API vs. a customer Supabase project.
Variant A — SDK-native
- 1Discovery — fetch entity schemas, server functions, auth config, and assets via Base44's REST API. Run compatibility scan over entities + functions + your frontend code.
- 2DDL synthesis — translate each Base44 entity schema into a Postgres
CREATE TABLEwith the right column types & constraints. - 3Data import — one job per non-skipped entity, chained linearly so Base44 isn't slammed with concurrent fetches. Page-by-page via the REST API into your new Supabase.
- 4Server functions — port each Base44 backend function to a Supabase Edge Function (with a small codemod for the import +
createClientswap). - 5Storage / assets — copy Base44 assets to a Supabase Storage bucket so your
media.base44.com/...URLs keep resolving. - 6Auth config — translate Base44's auth toggles (email/password, OAuth providers) into the matching Supabase Auth settings. OAuth client_secrets land in your one-time setup punchlist.
- 7Shim switchover — push a branch to your repo swapping
@base44/sdkfor the shim, rewritingsrc/api/base44Client, and patching.env.production. Review the PR & merge. - 8Next steps + downloadable package — frontend deploy options and a password-protected ZIP including
00_compatibility_review.mdfor your AI assistant.
Variant B — BYO-Supabase
- 1Discovery — read your repo and source Supabase to inventory tables, edge functions, storage buckets, auth providers, secrets, and cron jobs.
- 2DB migration — SQL files in
supabase/migrations/applied to your target. - 3Data import — temporary edge function commits to repo → Base44 deploys it (one chat prompt) → Staticbot calls it to export + import data, copy storage objects, migrate vault secrets, cron jobs, and OAuth identities.
- 4Edge functions deployed to your target Supabase.
- 5Storage buckets recreated (idempotent — usually already exist from Phase 3).
- 6Auth config migrated — providers, redirect URLs, JWT settings.
- 7Update Base44 secrets — Staticbot shows the new target URL + anon key with copy buttons. Paste into Base44 platform secrets and redeploy your app.
- 8Continuous sync + frontend deploy — enable webhook-driven sync so every Base44 push lands on your own Supabase + AWS automatically.
Manual migration · variant B
Manually move your Base44 + Supabase app to your own Supabase (8 steps)
These manual steps cover variant B (BYO-Supabase).
Your code already uses @supabase/supabase-js with VITE_SUPABASE_URL set as a Base44 platform secret. You're moving your existing Supabase data + functions to a new Supabase project you own. The steps below use the Base44 CLI + Supabase CLI + pg_dump.
Variant A (SDK-native with @base44/sdk) doesn't have a sensible manual walkthrough — entity-schema translation, the shim wiring, and the per-entity REST data fetch are too much to drive by hand. Use the automated path for variant A; it handles all of it end-to-end and you still see every step in the dashboard before confirming.
Prerequisites
- A new (empty) target Supabase project created at supabase.com
- Supabase CLI installed (
npm i -g supabase) and authenticated - Base44 CLI installed (
npm i -g @base44/cli) and logged in viabase44 login psqlavailable locally (ships with PostgreSQL client)- Your Base44 project's GitHub repo cloned locally
1Find your source Supabase credentials
Your Base44 platform secrets contain the VITE_SUPABASE_URL + anon key you need. The service-role key is only available from the Supabase dashboard.
List Base44 secrets
From your project root:
base44 secrets list
Values are masked. To copy the actual value, use the Base44 dashboard (Settings → Secrets) or set them via base44 secrets set on a different env to read back.
Source Supabase dashboard
Open https://supabase.com/dashboard/project/<ref> (where <ref> is from VITE_SUPABASE_URL) → Project Settings → API. Note both:
service_rolekey — needed for dumping with full privileges- Database connection string (Project Settings → Database) — for
pg_dump
2Link the Supabase CLI to your new target project
Replace <new-project-ref> with the ref of the empty Supabase project you created:
supabase link --project-ref <new-project-ref>
The CLI reads your repo's supabase/config.toml. If project_id is set there, update it to the new ref too so future supabase commands stay pointed at the right project.
3Push the database schema
Apply every SQL migration in supabase/migrations/ to the target:
Heads up: Base44 lets you run SQL in the Supabase SQL Editor without committing migration files
If you (or Base44's AI) ever applied schema changes directly via the SQL Editor on source without writing them into supabase/migrations/, those changes are missing from the repo and won't be pushed. Diff source vs target before moving on:
4Deploy your edge functions
Deploy every function under supabase/functions/ to your new Supabase project:
Base44 backend functions vs Supabase edge functions
Functions you defined via Base44 (base44 functions list) run on Base44's infrastructure, not on your source Supabase. After migration they keep working as long as your Base44 app exists. To move them onto your own Supabase as proper edge functions, re-export each one's source and re-author it inside supabase/functions/, then deploy via supabase functions deploy.
5Migrate data (with passwords intact)
Don't use CSV exports for this
Exporting tables as CSV from Supabase → Table Editor strips bcrypt password hashes from auth.users.encrypted_password, which forces every one of your users to reset their password. Use pg_dump instead — it preserves the hashes verbatim and gets foreign-key ordering right.
Dump source data with pg_dump
From the source Supabase dashboard (Settings → Database), copy the connection string and:
--schema=auth --schema=public --schema=storage \
"$SOURCE_DATABASE_URL" > data.sql
This dumps auth.users (including encrypted_password), auth.identities (OAuth links), all public-schema rows, and storage metadata — in the right dependency order.
Restore to your new Supabase
Grab the target's connection string from Supabase → Project Settings → Database and apply the dump:
Existing users sign in with their existing passwords — no reset email. Storage object files (the actual bytes in buckets) aren't in this dump; copy them separately via the Supabase CLI or rclone against the S3-compatible storage endpoint.
6Reconfigure OAuth providers
Google/GitHub/Apple OAuth client IDs and secrets live in Supabase's auth control plane, not in the database — pg_dump doesn't carry them. In your new project's dashboard go to Authentication → Providers and re-enter each provider's client ID, secret, and redirect URL. The matching auth.identities rows are already restored from Step 5, so once providers are configured, OAuth users continue signing in without re-authorising.
Update OAuth callback URL on the provider side too
Each OAuth provider (Google Cloud Console, GitHub OAuth Apps, etc.) needs the new https://<new-ref>.supabase.co/auth/v1/callback added as an allowed redirect URI. Without that, OAuth sign-in fails with "redirect_uri_mismatch".
7Update Base44 platform secrets to point at your new Supabase
Base44 reads VITE_* values from its platform secrets store at build time — not from .env in the repo. Updating the repo alone has no effect. Use the Base44 CLI to swap the values:
VITE_SUPABASE_URL=https://<new-ref>.supabase.co \
VITE_SUPABASE_ANON_KEY=<new-anon-key>
Per the Base44 CLI docs, any deployed backend functions that reference these secrets are automatically redeployed when you change them. The frontend bundle, however, only picks up the new values on the next deploy — covered in Step 8.
Alternative: ask Base44's AI
In the Base44 chat: "Set secrets: VITE_SUPABASE_URL=<url>, VITE_SUPABASE_ANON_KEY=<key>." Base44 will use its set_secrets tool — same end result as the CLI.
8Redeploy and verify
Deploy the whole project
Rebuilds the frontend with the new VITE_SUPABASE_* values baked in, and redeploys backend functions + entities + site assets.
Verify in the browser
Open your *.base44.app URL in an incognito window. In DevTools → Network, confirm requests are hitting https://<new-ref>.supabase.co, not the old project. Sign in with an existing user to confirm password hashes survived.
Optional: archive the source Supabase project
Once you've verified everything works against the new project, pause or delete the old source Supabase project so you stop being billed for it.
Post-Migration Checklist
supabase db pushbase44 deploy run successfullyPrefer the automated path?
Let Staticbot handle the migration for you — free right now
Skip the CLI dance: paste your *.base44.app URL, confirm each phase in a dashboard, done. Base44 migrations are free for a limited time.
~15
minutes
2–3 hrs
manual
Migrate your Base44 app today
Connect your GitHub repo, paste your *.base44.app URL for auto-detect, and walk through the migration in a guided dashboard.
FAQ
Related
- Base44 vs Supabase: what actually moves when you migrate — feature-by-feature compatibility deep-dive + compatibility-review explainer
- Continuous Sync — optionally keep editing in Base44, sync every push to your own Supabase + AWS or Cloudflare
- Lovable → Supabase migration — same pipeline for Lovable apps
- Self-hosted Supabase on AWS — for fully owning the backend
- AI Builder Migration — all builders